Overview
There are a few ways that faculty can share a video from their user Library (they must be the owner or permissions to post as a co-instructor) to an EchoVideo course. Students will have access to the video from the EchoVideo tab in Canvas's course navigation (left menu).
**Note: Media that can be published to a course include video, interactive media (video with polls), or a Presentation (PowerPoint or PDF).
Step 1: Find your video in your Library - Main screen
Locate the media you want to share to a class.
- Hover the video, click the three dots (bottom right)
- From the menu, click Share. This will open up the Share To window.
- In the Share To window you will set up sharing to your class. For instructions see the section "Sharing media to a Course Class"

Step 2: Share media to a Course
In the Share To window follow the steps below (refer to sample image if needed) to add your media to a class.
- Click Course (select name of course)
- Click Term (select the current term, an EchoVideo course does not work outside of Canvas terms). Note: If you do not see a current term, please visit svsu.edu/echohelp, click Create Ticket to fill out the course request form.
- Click Section (current section for your course)
- Click New Class (most common).
- Type in a Class Name (short, concise title for your media).
- Click Start Date (optional), select the calendar field to choose a date, a calendar widget will pop up, choose the date (as appropriate). Then select the "Start Time" and the "Duration" of the class.
- Type in a Class Description (optional) helpful to let student know what the lesson is about.
- Change the Available settings (optional) choices are: Now, Never, or select a Date.
- Change the Unavailable settings (optional) choices are: Now, Never, or select a Date.
- Click Share.

Note: After clicking Share, the media is published to your EchoVideo course. Students can access your content as long as you have made it available and you have requested a course for the current semester. **Alternatively, you can Add a Media to a Class while on the classes list page without having to leave your EchoVideo course.
Step 3: View the Shared Media in a Course
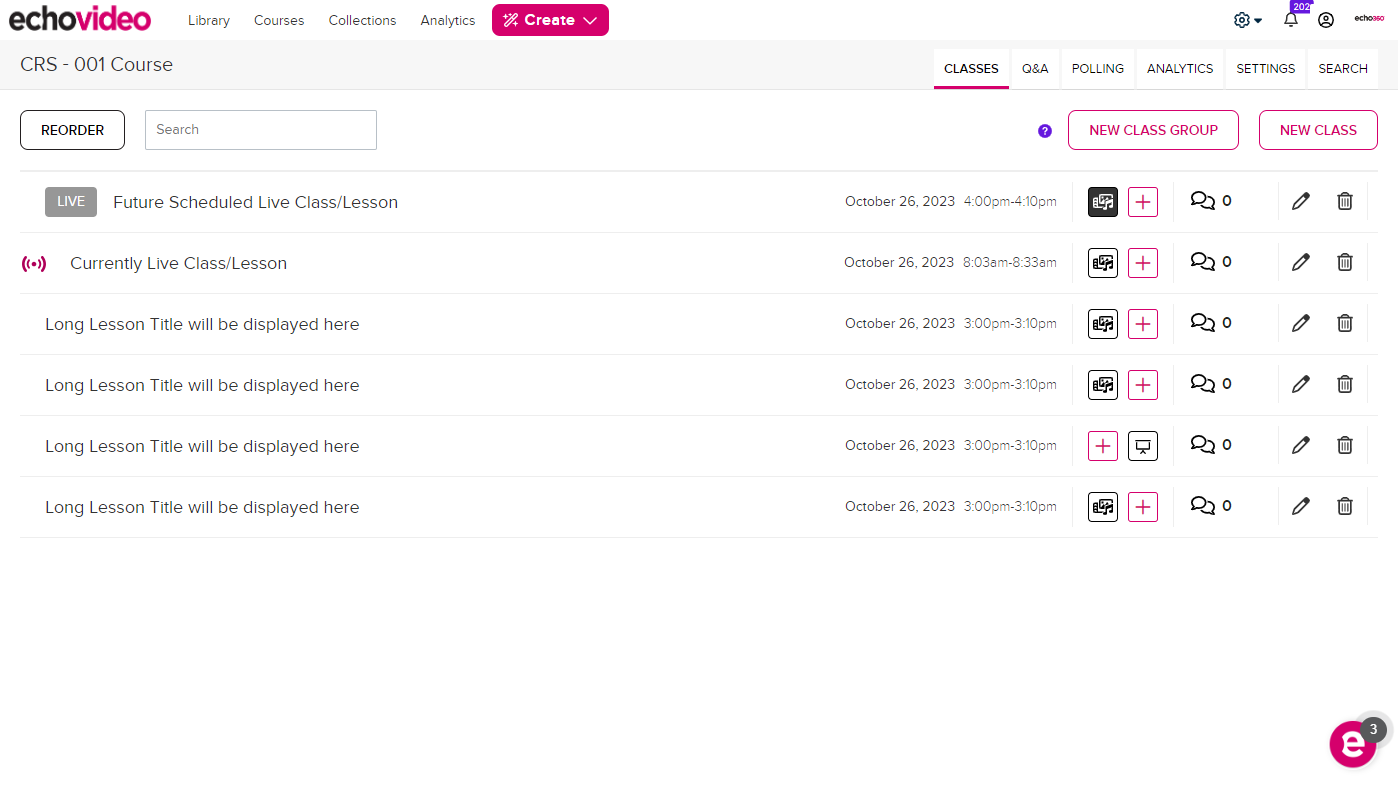
The media shared to the EchoVideo course can be viewed by students from Canvas's left menu. When a student clicks on the EchoVideo tab, they are automatically enrolled in the EchoVideo section and will see a list of all lessons. Students can watch or participate a video or access presentation slides as needed unless you decide to control the availability. All usage analytics can be viewed by the class or the individual student from the "Analytics" tab.
Note: Media in EchoVideo can be shared to multiple sections. You can view the newly shared media in your EchoVideo course. If you see dark grey with white (shown in the sample image below), this indicates that the media is hidden from students.

Share your media without an EchoVideo course and
embed your videos in Canvas. You can embed EchoVideo media in Canvas content types (e.g., Announcement, Page, Discussion, Assignment, or Quizzes content type), all media imports successfully to other courses and you can view usage analytics in your library. A discussion panel allows you and students to engage in conversation. See the sample image below.
How to access the Echo360 Embed tool
